The <ng-template> element in Angular is used for defining content that can be conditionally rendered or reused in the template. Unlike other elements like <div>, <ng-template> does not create a DOM element when it’s defined. The content inside an <ng-template> will only be rendered when explicitly referenced or triggered by Angular structural directives like *ngIf, *ngFor, ngSwitch, etc.
Use Case 1: Conditional Rendering with *ngIf
<ng-template> allows Angular to render content only when the condition is true. This can be more efficient than using elements like <div>, which would always create DOM elements, even if the content inside them isn’t shown.
Example: *ngIf with <ng-template>
<!-- Using <div> -->
<div *ngIf="isVisible">
  Content to display when isVisible is true
</div>

<!-- Using <ng-template> -->
<ng-template [ngIf]="isVisible">
  <div>Content to display when isVisible is true</div>
</ng-template>- In the first example, a
divis added to the DOM, even ifisVisibleis false. - In the second example, the content inside
<ng-template>is not added to the DOM unlessisVisibleis true. This avoids creating unnecessary DOM elements.
Use Case 2: Looping with *ngFor and <ng-template>
When using *ngFor, <ng-template> can be used to avoid creating multiple DOM elements unnecessarily. It provides a more efficient way to iterate over data, as the template will be reused for each item.
Example: Without <ng-template>
<!-- This creates a new <div> for each item in the list -->
<div *ngFor="let item of items">
  {{ item }}
</div>
Example: With <ng-template>
<ng-template ngFor let-item [ngForOf]="items">
  <div>{{ item }}</div>
</ng-template>- With
<ng-template>, the content inside the template is only created once and then reused for each item in the list, which reduces DOM manipulations.
Use Case 3: Using ngSwitch with <ng-template>
<ng-template> is useful with ngSwitch when you want to conditionally render content based on an expression. It helps keep the DOM clean and efficient by only rendering the relevant content.
Example: Using ngSwitch with <ng-template>
<div [ngSwitch]="selectedFruit">
  <ng-template [ngSwitchCase]="'apple'">
    <div>Apple selected!</div>
  </ng-template>
  <ng-template [ngSwitchCase]="'banana'">
    <div>Banana selected!</div>
  </ng-template>
  <ng-template [ngSwitchCase]="'orange'">
    <div>Orange selected!</div>
  </ng-template>
  <ng-template ngSwitchDefault>
    <div>No fruit selected!</div>
  </ng-template>
</div>- Here,
ngSwitchwill only render the<ng-template>corresponding to theselectedFruitvalue. - If
selectedFruitis'banana', the second<ng-template>will be displayed, and the other ones will be ignored.
Summary
<ng-template>is a powerful tool in Angular for conditionally rendering content.- It doesn’t create DOM elements on its own but allows content to be rendered when needed, improving performance and efficiency.
- You can use it with structural directives like
*ngIf,*ngFor, andngSwitchto control when and how content is rendered, keeping your DOM clean and efficient.
Implementation:
- Add Bootstrap to
index.html
<!doctype html>
<html lang="en">
<head>
  <meta charset="utf-8">
  <title>NgLab</title>
  <base href="/">
  <meta name="viewport" content="width=device-width, initial-scale=1">
  <link rel="icon" type="image/x-icon" href="favicon.ico">
  <link href="https://cdn.jsdelivr.net/npm/bootstrap@5.3.3/dist/css/bootstrap.min.css" rel="stylesheet" integrity="sha384-QWTKZyjpPEjISv5WaRU9OFeRpok6YctnYmDr5pNlyT2bRjXh0JMhjY6hW+ALEwIH" crossorigin="anonymous">
</head>
<body>
  <app-root></app-root>
</body>
</html>- Create a component and add the following code to
app.component.ts:
import { Component } from '@angular/core';

@Component({
  selector: 'app-your-component',
  templateUrl: './your-component.component.html',
  styleUrls: ['./your-component.component.css']
})
export class AppComponent {
  isShow: boolean = true;
  items: string[] = ['Item 1', 'Item 2', 'Item 3', 'Item 4'];
  toggleVisibility() {
    this.isShow = !this.isShow;
  }
}- Now, display the result in
app.component.html:
<!-- <h4>Hello,</h4> -->
<!-- <app-ng-template-demo-component></app-ng-template-demo-component> -->
<!-- Not show -->
<ng-template>
Hi 1
</ng-template>
<ng-template *ngIf="isShow"> <!--if we use into div then we give * symbol -->
Hi 2
</ng-template>
<!-- Show -->
<ng-template [ngIf]="isShow">
Hi
</ng-template>
<br>
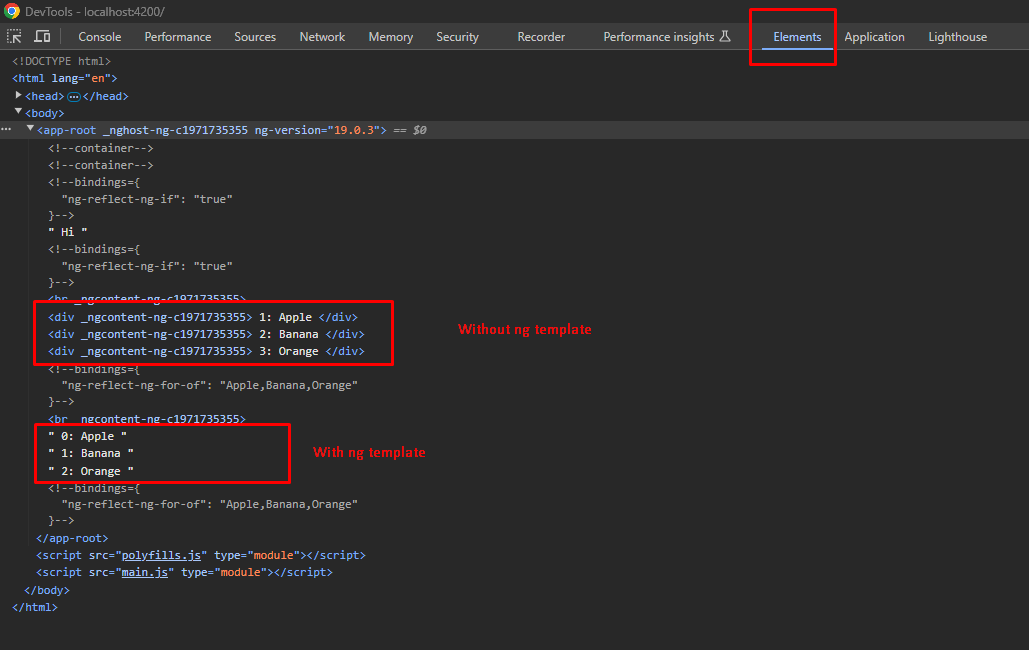
<!-- ng-template not generate div multiple times this reused one div video 59 at 16:00-->
<!-- without ng template -->
<!-- <div *ngFor="let item of items">
{{ item }}
</div> -->
<div *ngFor="let item of items; let i = index">
{{ i + 1 }}: {{ item }}
</div>
<br>
<!-- with ng template -->
<!-- <ng-template ngFor let-item [ngForOf]="items">
{{ item }}
</ng-template> -->
<ng-template ngFor let-item [ngForOf]="items" let-i="index">
{{ i + 1 }}: {{ item }}<br>
</ng-template>