Blog with Project: implementation-of-signalr-with-net-core
_This is an alternative link
SignalR Implementation Steps in .NET 8:
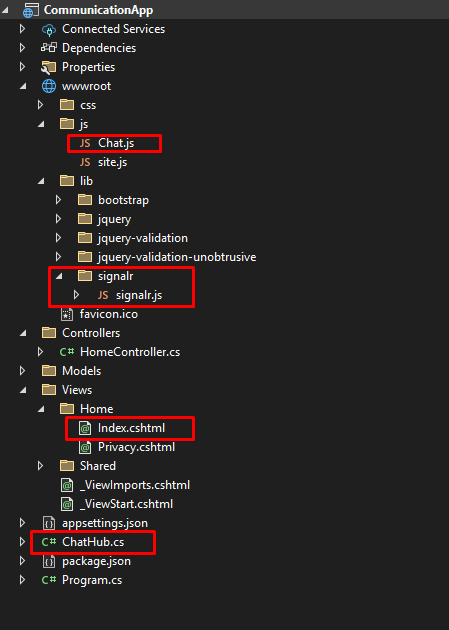
1. Create an ASP.NET Core Web App (Model-View-Controller) project named CommunicationApp
-
Update
Program.cs:
Add the following lines in theProgram.csfile:builder.Services.AddSignalR(); app.MapHub<ChatHub>("/chatHub"); -
Create
ChatHub.cs:using Microsoft.AspNetCore.SignalR; namespace CommunicationApp { public class ChatHub : Hub { public async Task SendMessage(string user, string message) { await Clients.All.SendAsync("ReceiveMessage", user, message); } public async Task SendNotification(string message) { await Clients.All.SendAsync("ReceiveNotification", message); } } } -
Create
HomeController:public class HomeController : Controller { private readonly ILogger<HomeController> _logger; public HomeController(ILogger<HomeController> logger) { _logger = logger; } public IActionResult Index() { return View(); } } -
Update
Index.cshtml:@{ ViewData["Title"] = "Home Page"; } <div> <input type="text" id="userInput" placeholder="Name" /> <input type="text" id="messageInput" placeholder="Message" /> <button onclick="sendMessage()">Send Message</button> <button onclick="sendNotification()">Send Notification</button> </div> <ul id="messagesList"></ul> <script src="~/lib/signalr/signalr.js"></script> <script src="~/js/chat.js"></script> -
Create
Chat.js(located inwwwroot/js/):
Alternatively, you can directly add the script code intoIndex.cshtml.const connection = new signalR.HubConnectionBuilder() .withUrl("/chathub") .build(); connection.on("ReceiveMessage", (user, message) => { const li = document.createElement("li"); li.textContent = `${user}: ${message}`; document.getElementById("messagesList").appendChild(li); }); connection.on("ReceiveNotification", (message) => { alert(`Notification: ${message}`); }); connection.start().catch(err => console.error(err)); function sendMessage() { const user = document.getElementById("userInput").value; const message = document.getElementById("messageInput").value; connection.invoke("SendMessage", user, message).catch(err => console.error(err)); } function sendNotification() { const message = document.getElementById("messageInput").value; connection.invoke("SendNotification", message).catch(err => console.error(err)); } -
Install SignalR and Set Up Files:
-
In your project, open the Command Prompt and run:
npm init -y npm install @aspnet/signalr -
Copy
signalr.jsfromCommunicationApp\node_modules\@aspnet\signalr\dist\browser\signalr.jsand paste it into thewwwroot/libfolder.
(Alternatively, you can use the CDN and skip the npm installation by adding the following line to yourIndex.cshtml):<script src="https://cdnjs.cloudflare.com/ajax/libs/microsoft-signalr/5.0.11/signalr.min.js"></script>
-
-
Test the Application:
- Open multiple tabs in your browser (including an incognito window) and navigate to
http://localhost:xxxx. - When you send a message, it will be visible to all connected users.
- When you click on a notification, it will only be visible to users who are currently using or have the tab open.
- Open multiple tabs in your browser (including an incognito window) and navigate to