Dockerfile Reference
| Command | |
|---|---|
| FROM | Base Image name |
| MAINTAINER | Reference of maintainer |
| RUN | To run a command in shell |
| EXPOSE | To expose / open a port |
| WORKDIR | To set current directory |
| USER | To set current user account |
| COPY | To copy file from host to container |
| VOLUME | To map a directory of host with container |
| ENTRYPOINT | To execute command on start of container |
| CMD | To run a command/Shell script |
Key Note
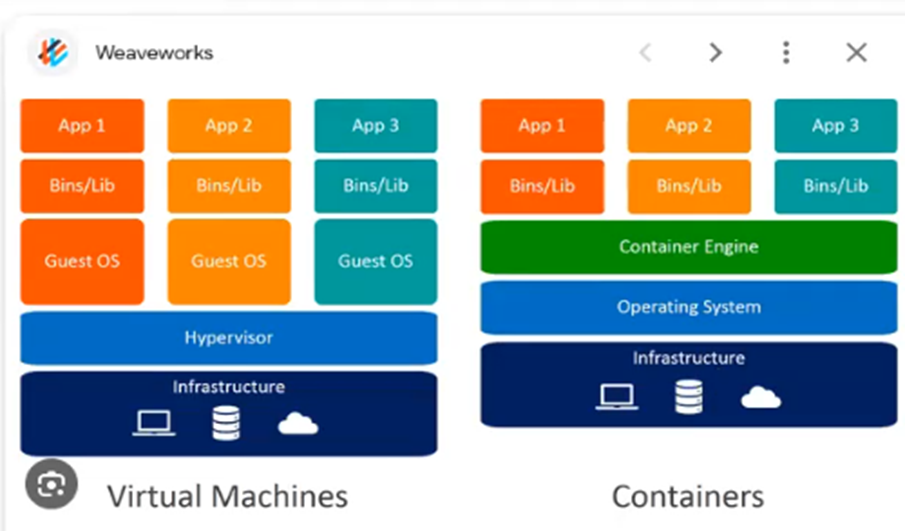
Here, VM and Container bother have insfrastructure.
VM create OS using GuestOS and VM has hypervisor which can create and run multiple virtual machine on a single computer. On the other hand container have only one OS and container engine which can create multiple container from a single OS, as a result container is so much lightweight.
Bin/Lib in VM is the layer that shares binaries and libraries between applications. Which have runtime, jdk, sdk and others
Dockerfile have no extension
Image: A lightweight, standalone, and executable package that includes everything needed to run a piece of software, including the code, runtime, libraries, and system tools. (Image is like a template)
Container: A runnable instance of a Docker image, encapsulating the application and its dependencies, isolated from the host system and other containers. (যেটা চলে সেটা কন্টেইনার। যেটা থেকে কন্টেইনার বানানো হয় সেটা ইমেজ)
Volume: A persistent data storage mechanism in Docker, allowing data to be shared and preserved between containers and the host machine.
# Use the official .NET SDK image version 7.0 as the base for building the application.

FROM mcr.microsoft.com/dotnet/sdk:7.0 AS build

# Specify the maintainer of the Dockerfile, for documentation purposes.

MAINTAINER Dev Skill

# Set the DEBIAN_FRONTEND variable to noninteractive to prevent interactive prompts during package installation.

ARG DEBIAN_FRONTEND=noninteractive

# Update the package repository to ensure the latest packages are available for installation.

RUN apt-get update

# Install the Apache web server.

RUN apt-get install -y apache2

# Set the working directory to /var for subsequent commands.

WORKDIR /var

# Expose port 80 to allow external access to the Apache web server.

EXPOSE 80

# Start the Apache web server in the foreground when the container is run.

CMD apachectl -D FOREGROUND
· Some command:
| Category | Command | Description |
|---|---|---|
| Images | docker build -t test -f “D:\Users\msash\Desktop\MyCode\ASP.NET\Recap ASP.NET\Dockerfile” . | Build a Docker image named “test” using the specified Dockerfile. |
| docker images | Display a list of all Docker images. | |
| docker rmi -f test | Delete the Docker image named “test”. | |
| docker run test | Run the “test” image, creating a container. Use -d to run in detached mode (in the background). | |
| Container | docker ps | Show all running containers. |
| docker ps -a | Show all containers, including those that are stopped. | |
| docker run -d -it test | Run the “test” image in interactive mode and detached mode, allowing interaction with the terminal. After entering the container, run commands like apt-get update and apt-get install -y apache2. | |
| docker stop f39fc84feb38 05baeb405c86 | Stop two containers with the specified container IDs. | |
| docker rm -f f39fc84feb38 | Remove a container with the specified container ID. | |
| docker run -d -p 8000:80 test | Run the “test” image, mapping port 8000 on the host to port 80 in the container. Use -d to keep the command running in the background. | |
| docker container prune | Stop and remove all stopped containers. | |
| Volume | docker volume ls | List all Docker volumes. |
| docker volume create —driver local —opt type=none —opt device=“D:\Users\msash\Desktop\MyCode\ASP.NET\Recap ASP.NET\shared” —opt o=bind test-shared | Create a Docker volume named “test-shared” with specified options for local binding. | |
| docker run -d -v test-shared:/var/www/html -p 8000:80 test | Run the “test” image, creating a new container with a volume named “test-shared” mapped to /var/www/html. | |
| docker volume rm test-shared | Remove the Docker volume named “test-shared”. | |
| docker exec 3b60ce04778a cat /var/www/html/home.html | Execute a command (cat /var/www/html/home.html) inside the specified container, displaying the contents of the specified file. |
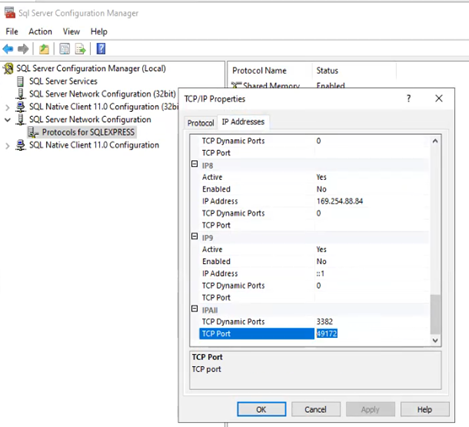
Access into the MS SQL Server from Docker:
- First go to Sql server configuration manager appications. if not found into the app manager then go to path “C:\Windows\SysWOW64\SQLServerManager16.msc” (if sql server 2019 then search accordingly. Mind it SQL server and SSMS is version is not same).
- **Docker file command:
# Use the .NET SDK 7.0 as the base image for building the application.

FROM mcr.microsoft.com/dotnet/sdk:7.0 AS build

# Set the working directory to /src.

WORKDIR /src

# Update package repository and install Node.js (we install node for future typescript), which may be required for certain build processes.

RUN apt-get update && apt-get install -y nodejs

# Copy the Worker project files (University.Worker/*.csproj) to the container (University.Worker/).

COPY ["University.Worker/*.csproj", "University.Worker/"]

# Copy the Infrastructure project files.

COPY ["University.Infrastructure/*.csproj", "University.Infrastructure/"]

# Copy the Persistence project files.

COPY ["University.Persistence/*.csproj", "University.Persistence/"]

# Copy the Application project files.

COPY ["University.Application/*.csproj", "University.Application/"]

# Copy the Domain project files.

COPY ["University.Domain/*.csproj", "University.Domain/"]

# Restore the dependencies for the Worker project.

RUN dotnet restore "University.Worker/University.Worker.csproj"

# Copy the entire application to the container.

COPY . .

# Change the working directory to the Worker project.

WORKDIR "/src/University.Worker"

# Build the Worker project in Release mode. (In dotnet we use Debug mode which copy extra information what we not need that why we use Release here, -o means output what keep into app folder)

RUN dotnet build "University.Worker.csproj" -c Release -o /app

# Create a new build stage named "publish" based on the previous "build" stage.

FROM build AS publish

# Publish the Worker project to the /app directory.

RUN dotnet publish "University.Worker.csproj" -c Release -o /app

# Create a new build stage named "final" based on the "build" stage.

FROM build AS final

# Set the working directory to /app.

WORKDIR /app

# Copy the published output from the "publish" stage to the final stage.

COPY --from=publish /app .

# Set the entry point command for running the application when the container starts. (dotnet is tool)

ENTRYPOINT ["dotnet", "University.Worker.dll"]
- Set a YML:
version: "3"

services:

    worker:

        build:

            # This context means from where building will be running (this can not be point one level upper directory)

            context: .

            dockerfile: University.Worker\Dockerfile

        image: university-worker-image

        env_file:

            - Env/worker.env

        container_name: university-worker-container

        volumes:

         - university-worker-volume:/app/Logs

        depends_on:

            - api

            - web

        entrypoint: ["dotnet", "University.Worker.dll"]

volumes:

    university-worker-volume:

       external: true
- Write a ENV file: (This will be change for docker endpoint or local file endpoint to access db)
ConnectionStrings:DefaultConnection="Server=192.168.43.29,49172\\SQLEXPRESS;Database=StudentDB;User Id=msa;Password=123456;Trust Server Certificate=True;"