1. Create an ASP.NET Core Web API Project
Start by creating an ASP.NET Core Web API project targeting the .NET 9 runtime.
2. Add the Required NuGet Packages
Add the following NuGet packages to your project:
<PackageReference Include="NSwag.AspNetCore" Version="13.17.0" />
<PackageReference Include="NSwag.Generation" Version="13.17.0" />
<PackageReference Include="Newtonsoft.Json" Version="13.0.3" /> <!-- Optional -->
3. Remove Swashbuckle and Add NSwag
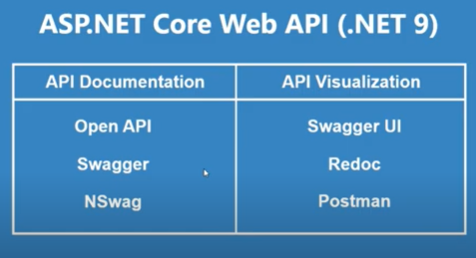
Both Swashbuckle and NSwag are used to generate Swagger documentation, but NSwag also provides client code generation features. If you need more details on OpenAPI vs Swagger, check out this link, and for a comparison between Swashbuckle and NSwag, you can watch this video.
a. Remove Swashbuckle: Remove the following code from Program.cs or Startup.cs:
builder.Services.AddEndpointsApiExplorer();
builder.Services.AddSwaggerGen();

app.UseSwagger();
app.UseSwaggerUI(); // If there is any Swashbuckle.AspNetCore installed, uninstall it. Then check https://localhost:XXXX/swagger/index.html
b. Add NSwag: Add the following to configure NSwag:
builder.Services.AddOpenApiDocument(config =>
{
    config.Title = "My API";
    config.Version = "v1";
});

app.UseOpenApi();
app.UseSwaggerUi3();
4. Configure CORS Policy
Add a CORS policy to allow requests from Angular or other front-end clients.
builder.Services.AddCors(options =>
{
    options.AddPolicy("AllowAngularOrigin", policy =>
    {
        policy.WithOrigins("http://localhost:4200")
              .AllowAnyMethod()
              .AllowAnyHeader()
              .AllowCredentials();
    });
});

app.UseCors("AllowAngularOrigin");
5. Built-in Controller Example
Example of a simple built-in controller:
namespace WebApplicationA1.Controllers
{
    [ApiController]
    [Route("[controller]")]
    public class WeatherForecastController : ControllerBase
    {
        private static readonly string[] Summaries = new[] {
            "Freezing", "Bracing", "Chilly", "Cool", "Mild", "Warm", "Balmy", "Hot", "Sweltering", "Scorching"
        };

        private readonly ILogger<WeatherForecastController> _logger;

        public WeatherForecastController(ILogger<WeatherForecastController> logger)
        {
            _logger = logger;
        }

        [HttpGet(Name = "GetWeatherForecast")]
        public IEnumerable<WeatherForecast> Get()
        {
            return Enumerable.Range(1, 5).Select(index => new WeatherForecast
            {
                Date = DateOnly.FromDateTime(DateTime.Now.AddDays(index)),
                TemperatureC = Random.Shared.Next(-20, 55),
                Summary = Summaries[Random.Shared.Next(Summaries.Length)]
            })
            .ToArray();
        }
    }
}
6. Add the Custom Controller
Example of a custom controller:
namespace WebApplicationA1.Controllers
{
    [Route("api/[controller]")]
    [ApiController]
    public class ProductController : ControllerBase
    {
        private static List<string> products = new List<string> {
            "Product 1", "Product 2", "Product 3", "Product 4", "Product 5", "Product 6"
        };

        [HttpGet]
        public ActionResult<IEnumerable<string>> GetProducts()
        {
            return Ok(products);
        }

        [HttpGet("DownloadForecastReport")]
        [ProducesResponseType(typeof(FileContentResult), StatusCodes.Status200OK)]
        public IActionResult DownloadForecastReport()
        {
            var reportData = System.Text.Encoding.UTF8.GetBytes("Sample report data…");
            return File(reportData, "application/octet-stream", "ForecastReport.txt");
        }
    }
}
7. Run the Project
Once the project is running, you can access the Swagger UI and the OpenAPI definition at:
https://localhost:7185/swagger/v1/swagger.json

For TypeScript client: (Run the command in the Package Manager Console)
nswag openapi2tsclient /input:https://localhost:7185/swagger/v1/swagger.json /output:"D:\Users\Shoyeb\Desktop\WebApplicationA1\web-api-client.ts"For C# client:
nswag openapi2csclient /input:https://localhost:7185/swagger/v1/swagger.json /output:"D:\Users\Shoyeb\Desktop\WebApplicationA1\web-api-client.cs" /namespace:"WebApplicationA1"8. Auto-generated Code
After running the NSwag command, the client code is auto-generated. Below is an example of the generated TypeScript code:
//----------------------
// <auto-generated>
//     Generated using the NSwag toolchain v14.2.0.0 (NJsonSchema v11.1.0.0 (Newtonsoft.Json v13.0.0.0)) (http://NSwag.org)
// </auto-generated>
//----------------------

/* tslint:disable */
/* eslint-disable */
// ReSharper disable InconsistentNaming

export class ProductClient {
    private http: { fetch(url: RequestInfo, init?: RequestInit): Promise<Response> };
    private baseUrl: string;
    protected jsonParseReviver: ((key: string, value: any) => any) | undefined = undefined;

    constructor(baseUrl?: string, http?: { fetch(url: RequestInfo, init?: RequestInit): Promise<Response> }) {
        this.http = http ? http : window as any;
        this.baseUrl = baseUrl ?? "https://localhost:7185";
    }

    getProducts(): Promise<string[]> {
        let url_ = this.baseUrl + "/api/Product";
        url_ = url_.replace(/[?&]$/, "");

        let options_: RequestInit = {
            method: "GET",
            headers: {
                "Accept": "application/json"
            }
        };

        return this.http.fetch(url_, options_).then((_response: Response) => {
            return this.processGetProducts(_response);
        });
    }

    protected processGetProducts(response: Response): Promise<string[]> {
        const status = response.status;
        let _headers: any = {}; if (response.headers && response.headers.forEach) { response.headers.forEach((v: any, k: any) => _headers[k] = v); };
        if (status === 200) {
            return response.text().then((_responseText) => {
                let result200: any = null;
                let resultData200 = _responseText === "" ? null : JSON.parse(_responseText, this.jsonParseReviver);
                if (Array.isArray(resultData200)) {
                    result200 = [] as any;
                    for (let item of resultData200)
                        result200!.push(item);
                }
                else {
                    result200 = <any>null;
                }
                return result200;
            });
        } else if (status !== 200 && status !== 204) {
            return response.text().then((_responseText) => {
                return throwException("An unexpected server error occurred.", status, _responseText, _headers);
            });
        }
        return Promise.resolve<string[]>(null as any);
    }
}
9. Create an Angular Project
Create an Angular project and generate a component as follows:
ng new ngLab
ng g c my-component
Add the component to app.component.html:
<app-my-component></app-my-component>10. Angular Component Example
The TypeScript code for the Angular component:
import { Component, OnInit } from '@angular/core';
import { ProductClient, WeatherForecast, WeatherForecastClient } from '../../../../WebApplicationA1/test.api';

@Component({
  selector: 'app-my-component',
  templateUrl: './my-component.component.html',
  styleUrls: ['./my-component.component.css']
})
export class MyComponentComponent implements OnInit {
  products: string[] = [];
  weatherForecasts: WeatherForecast[] = [];
  errorMessage: string = '';

  private productClient: ProductClient;
  private weatherForecastClient: WeatherForecastClient;

  constructor() {
    this.productClient = new ProductClient();
    this.weatherForecastClient = new WeatherForecastClient();
  }

  ngOnInit(): void {
    this.loadProducts();
    this.loadWeatherForecast();
  }

  loadProducts(): void {
    this.productClient.getProducts().then(
      (products) => {
        this.products = products;
      },
      (error) => {
        this.errorMessage = `Error fetching products: ${error.message}`;
      }
    );
  }

  loadWeatherForecast(): void {
    this.weatherForecastClient.get().then(
      (forecast) => {
        this.weatherForecasts = forecast;
      },
      (error) => {
        this.errorMessage = `Error fetching weather forecast: ${error.message}`;
      }
    );
  }

  downloadForecastReport(): void {
    this.productClient.downloadForecastReport().then(
      (response) => {
        const blob = response.data;
        const link = document.createElement('a');
        link.href = URL.createObjectURL(blob);
        link.download = response.fileName || 'forecast-report.csv';
        link.click();
      },
      (error) => {
        this.errorMessage = `Error downloading forecast report: ${error.message}`;
      }
    );
  }
}
11. Angular HTML Example
The HTML code for displaying products, weather forecast, and a button to download the forecast report:
<div *ngIf="errorMessage" class="error">{{ errorMessage }}</div>

<h2>Products</h2>
<ul>
  <li *ngFor="let product of products">{{ product }}</li>
</ul>

<h2>Weather Forecast</h2>
<ul>
  <li *ngFor="let forecast of weatherForecasts">
    {{ forecast.date | date }} - {{ forecast.temperatureC }}°C ({{ forecast.temperatureF }}°F) - {{ forecast.summary }}
  </li>
</ul>

<button (click)="downloadForecastReport()">Download Forecast Report</button>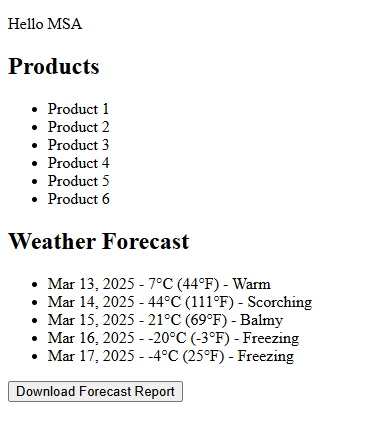
12. Additional Notes
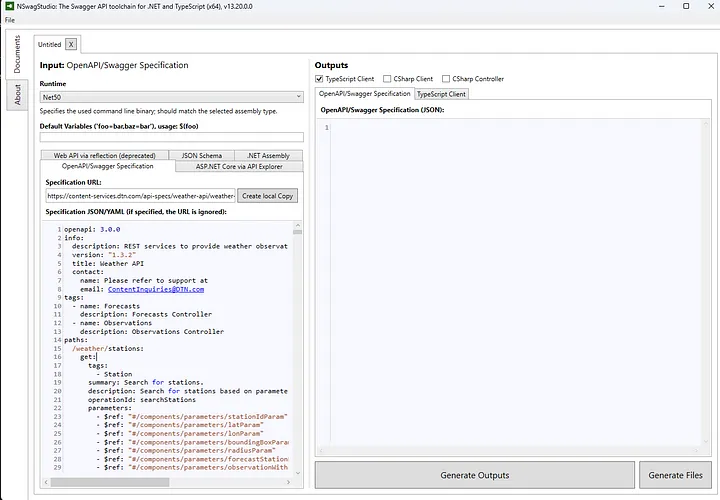
You can also use NSwagStudio (the desktop tool. Download) to generate client code. For more details, refer to this blog post.
In the JSON, create a file named config.nswag or nswag.json. Inside this file, include the documentGenerator named specification.json (an exact copy of the OpenAPI YAML), and another file for the generated client, such as api-service.ts (which contains the TypeScript client). Then, in the .csproj file, include a <Target> element so that the client code is automatically generated during the build process. We can also achieve the same thing by using the nswag run nswag.json command in the console manager. Next time, we will try this method.